Compatibility: Shopify 2.0 FREE themes
In my opinion, Shopify pays a little attention to blog posting and only provide few options.
Things that I would like to see in the future with Shopify's blog articles are the following:
- Articles added as metafield item
- Able to have collection of articles
- Article template layout than can be edited like the index layout
Check DEMO store here 💻. Password: made4uo
I found it as a tedious work to use metafield for category, since you have to go in the article and assign each article to a metafield. It is easier to mark the articles and just tag at once.
What are Blog Post Category And More?
The phrase "Blog Post Category And More" likely refers to the broader topic of blog post organization and customization on a Shopify store. Here's a breakdown:
-
Blog Post Category:
- This refers to a classification system for your blog posts on Shopify. Think of it like filing folders for your blog content.
- Categories help users find related blog posts easily by grouping them based on a common theme or topic (e.g., "Product Reviews," "Fashion Tips," "Industry News").
- Shopify themes typically allow you to assign categories to each blog post during creation.
-
And More:
- This indicates the article explores additional customization options beyond just blog post categories for your Shopify store.
- It likely delves into other aspects of design and functionality that can be tailored to match your brand and improve the user experience.
-
This "And More" section might cover aspects like:
- Color scheme and typography adjustments
- Layout and spacing modifications for product pages and other sections
- Banner and image customization to showcase your brand message
- Navigation menu optimization for improved usability.
Why use Blog Post Category And More?
There are several reasons why using blog post categories and additional customization options can be beneficial for your Shopify store:
Improved Organization and Navigation:
-
Blog Post Categories:
- Users can easily find relevant content: By sorting blog posts into categories, users can quickly browse topics that interest them. This saves them time and frustration searching through a large pool of uncategorized content.
- Enhanced SEO (Search Engine Optimization): Categories can help search engines understand the structure and content of your blog, potentially leading to higher rankings for relevant search queries.
Additional Consideration:
- Blog Post Categories: Implement a clear hierarchy, choose appropriate names, maintain balance, and ensure visibility.
- Customization: Focus on target audience preferences, mobile responsiveness, usability testing, a minimalist approach, and design consistency.
What you are buying:
- Create a blog category or menu on the side of your blog
- Hide and show articles
What makes our code better:
- We do not use external libraries, with that being said, our code will have no to minimal effect to your website's speed performance
- We do not leave or add codes use to advertise for our website
- Our code is mobile friendly
Steps on how to add Blog Post Categories
To add tags to your article, please follow the instructions below.
Step #1Go to your Admin page, click Online Store > Blog posts.
Step #2Mark the checkbox to the corresponding article.
Step #3Click Actions > Add Tags, then type the tag you want to apply to the selected articles. Lastly, click "Apply changes."
To add a category in your articles, please follow the instructions below.
Step #1. Open your code editor
From you Admin page, go to Online store, then Themes. Choose the theme you want to edit, then click the three dots, then Edit code.
Step #2. Create a new section file
In Section folder, create a new section, name it "blog-menu", then paste the code below. Do not forget to click SAVE.
Step #3. Create New Blog Template
We need to create a new blog template. Go to the template folder, add a new template, and follow the settings below. Click "Create template."
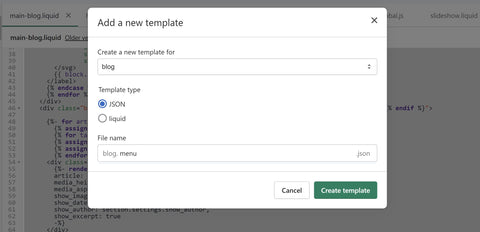
In the newly created template, paste the code below. Make sure click SAVE.
Step #4. Assign the template
Make sure you make the edited theme live before we can proceed. You can assign the template by going to Online Store > Blog posts > Click on the article.
You should see this section (see image below) in your right hand bottom corner. Change it to "menu."

Step #5. Customize theme
Go to the theme editor by clicking three dots on your left hand upper corner, then Customize theme. Make sure to SAVE once you are done customizing
Conclusion
Building a successful Shopify store involves more than just displaying products. Strategic organization and customization are key ingredients for creating a user-friendly and engaging experience that drives sales.
This article explored the importance of:
- Blog Post Categories: They organize your content, improve navigation, enhance SEO, and build trust with your audience.
- Customization: It allows you to tailor the store's design and functionality to resonate with your brand and target audience, potentially leading to increased engagement and conversions.
Remember:
- Clarity and Hierarchy: Maintain a clear category structure and choose concise category names that accurately reflect the content.
- Target Audience: Focus your customization choices on what appeals to your target audience and optimizes the user experience for them.
- Mobile Optimization: Ensure all aspects, including categories and design elements, function flawlessly on mobile devices.
- Usability Testing: Gather user feedback through testing to identify areas for improvement.
- Balance and Consistency: Strive for a balance between customization and a clean, uncluttered design. Maintain consistency in design style throughout your store.