Compatibility: All Shopify 2.0 FREE themes ONLY. Works from lower version to version 12
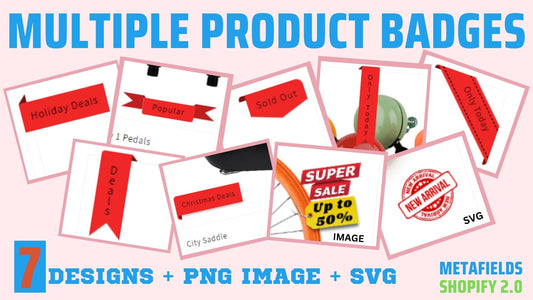
Are you tired of the default badges provided by your Shopify 2.0 FREE theme? The following will help you customize the boring design of your badge. You can choose from seven (7) badge design, and also use your personalized image (PNG only) or svg as your badge.
Product badges or labels help customers find what they are looking for with the eye catchy labels. Create custom badges using your own image or SVG or use our 7 designs.
Check DEMO store here💻. Password: made4uo
What are Multiple Design Product Badges?
That allows you to customize the design of the badges on your products. You can choose from seven different badge designs, or use your own custom image (PNG only) or SVG. This can help customers find what they are looking for more easily.
Why use Multiple Design Product Badges?
Is to customize the design of the badges on your Shopify store. This can help your customers find what they are looking for more easily with eye-catching labels. You can choose from seven badge designs or use your own image or SVG.
Additional Considerations:
- Consider the overall design of your store: The badges should complement the overall design of your store and not clash with other visual elements.
- Don't overdo it: Too many badges can be overwhelming for customers. Use them strategically to highlight important information about your products.
- Test different badge designs: See what resonates best with your customers.
- Make sure the badges are clear and easy to read: The text on the badges should be easy to read, even on small screens.
- Use contrasting colors: The text and background color of the badges should contrast enough to be easily readable.
What you are buying:
- Assign any of the 7 Badge designs or image or SVG for each product
- Code able to use personalized image (support PNG file only)
- Code able to use the SVG file
- Change the position of the badges
- Change the badge color and the text color
- Use metafield to customized the badges with your own text, design, and position
- Make sure not to use longer texts for code to function well
- Labels will show in featured collection section and collection page
- Customize the label or badge per product
What makes our code better:
- We do not use external libraries, with that being said, our code will have no to minimal effect to your website's speed performance
- Our code is mobile friendly
Any issues related to the code will be fix with no additional cost, excluding code customization requests. Simply contact us with "Chat with us." We are just a button away.
Setting up the metafield:
1. On your Admin Page, click the Settings on your left hand bottom corner
2. Click Metafields, then Products, then "Add defination"
3. Follow the metafield settings below. Words are case-senstive. Follow the green highlighted settings. Red is your own text or file name that you want to use.

4. Make sure to add the following in your preset choices.
5. You can add the text you want to appear in the badge as preset choice.
NOTE: Some of the badges will not be able to accommodate long texts.
6. If you are using image (PNG only) or SVG, make sure to add the file first. Then add the name of the file in your metafield presets.
Adding the metafield in the product:
1. From your Admin Page, click Products, then choose the product you want to assign a metafield.
2. Scroll all the way down, until you see the metafield.
3. Click "Add item", to create three (3) tier metafield.
First tier, should be the text you want in a badge or if you are using PNG image or SVG, use the first tier to provide the file name.
Second tier, the badge design. If you want to use image or SVG, make sure to click the image or SVG as your second tier.
Third tier, the badge position. Some of the badge design does not go with other position.

Badge Designs with the corresponding available position:
Adding the files (PNG image or SVG):
1. From your Admin Page, click Online Store > Themes >Actions > Edit code.
2. In the Assets folder, click "Add a new asset". Upload a file, then "Add file."
3. Find the file you want to add, then Open, click Done.
4. The file name must match to the text you provide in your first tier metafield. You can edit the name of the file by clicking the pencil. See image below

See the metafield assigned that matches to the file name

Steps on how to addMultiple Design Product Badges
Step #1. Open your code editor
From you Admin page, go to Online store, then Themes. Choose the theme you want to edit, then click the three dots, then Edit code
Step #2. Create a new snippet file
In the Snippet folder, click "Add a new snippet", name it "product-badge" then place the code below. Make sure to click SAVE.
Step #3. Repace the default badfge code
We need to replace the default badge code under the Snippet folder.
For Dawn theme with version below 2.5, open the product-card.liquid. Find the code below.

For Dawn theme version 2.5 and above, or other Shopify 2.0 FREE themes , open the card-product.liquid. Find the code below. NOTE: There are two identical codes. First one is in the line 118, and the second one is in line 314. Make sure to replace both block of code.
NOTE: The line number of the code might have change, but you should be able to find the code somewhere in the area.
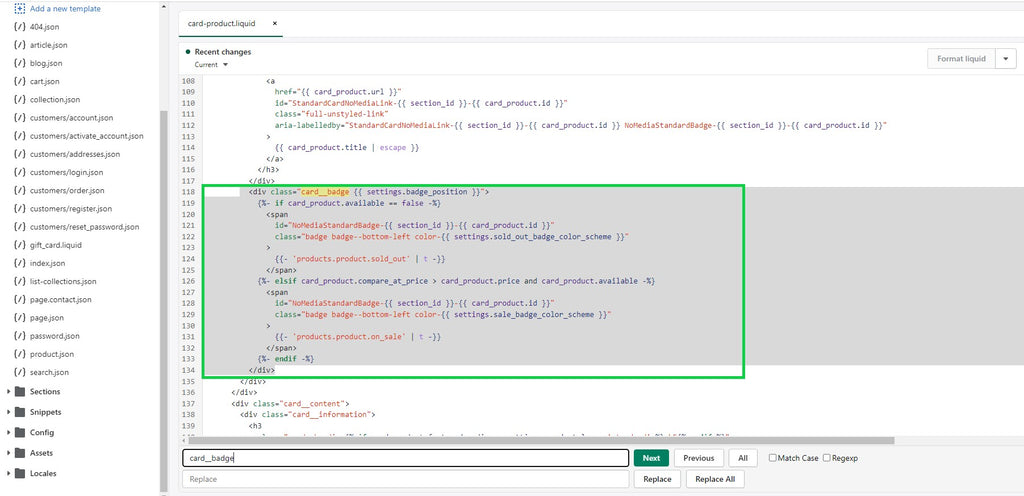
Step #4. Replace code
Replace the code with the code below.
Step #5. Add schema
Open the Config folder, then settings_schema.json. Scroll all the way down, find the last "]" (closing square backet), then place the code below before it.
This will provide options when you open the Theme editor.

Make sure to click the checkbox if you have Dawn theme version below 2.5.
Step #6. Save the changes
Once you've added the code, save your changes to the theme code by clicking the SAVE button on the right hand upper corner.
Step #7. Customize theme
Go to the theme editor by clicking three dots on your left hand upper corner, then Customize theme. Make sure to SAVE once you are done customizing.
Conclusion
Multiple Design Product Badges for Shopify offers a powerful tool to enhance your product presentation and user experience. Here's a recap of its benefits:
- Customization Freedom: Go beyond the generic badge designs and choose from seven pre-made options or create unique badges using your own PNG or SVG images.
- Targeted Communication: Highlight important product information like "New Arrival" or "Sale" with eye-catching badges, grabbing customer attention and potentially boosting sales.
- Improved User Experience: Clear and informative badges help customers quickly understand key product details, making the shopping process smoother and more efficient.
